Continuous Integration with Unity3D and Jenkins – Part 3

Introduction

For smaller game companies it is fairly common to work on multiple game projects at the same time. Utilizing Continuous Integration for multiple projects with each targeting multiple platforms can result in an increased number of builds.

In this post I am going to describe a way to decrease waiting times by adding additional so called slave nodes to Jenkins. Jenkins uses a “master/slave” mode in which the workload of build jobs is delegated to different slave nodes.


Jenkins Slave Nodes

Slave nodes are computers that offload build jobs from the Jenkins master. Once the slave is setup Jenkins handles the delegation of work fairly automatically. Each job can specify how the delegation behaves. Jobs can be bound to a specific slave, while some may roam freely between slave nodes. Each slave is setup as a so called “slave agent”. Therefore there is no need to install Jenkins on the slave computers. There are different ways to set up a slave, but in the end the master and the slave establish a bi-directional communication. The next sections will explain how to add slave agents using a windows or OSX computer. Keep in mind that your computers need to have a logged-in user with access to the windowsserver (OSX) or the graphical desktop (Windows) if you want to perform Unity builds.


Windows Slave Agents

First you need to add a new slave agent in Jenkins.

  • Go to Manage Jenkins -> Manage Nodes -> Add New Node.
  • Create a new node of type Dumb.
  • Set the slave name to something like the target computers name.
  • You can specify a label for the slave that can be used to bind Jenkins jobs to slaves with a specific label. For example: iOS, Android, Win32 etc.
  • Set the target base directory for the slave agent executable to be installed. That will also be the location of the slaves local Jenkins work spaces.
  • Set the slave to start via JNLP.


Now its time to setup the Jenkins slave agent.

  • On the target machine open the following url: http://<jenkins-ip-and-port>/computer/<slave-name>/slave-agent.jnlp.
  • Download the jnlp file and open it. It might be necessary to update Java before being able to run the application.
  • Once the jnlp is opened, click on File -> Install Jenkins as a Service.
  • Now the slave agent is up and running, but it does not have access to the graphic card. Go to Services -> Jenkins Slave -> Properties -> Log On. Check Allow service to interact with desktop and enter a credentials of the default computers user.

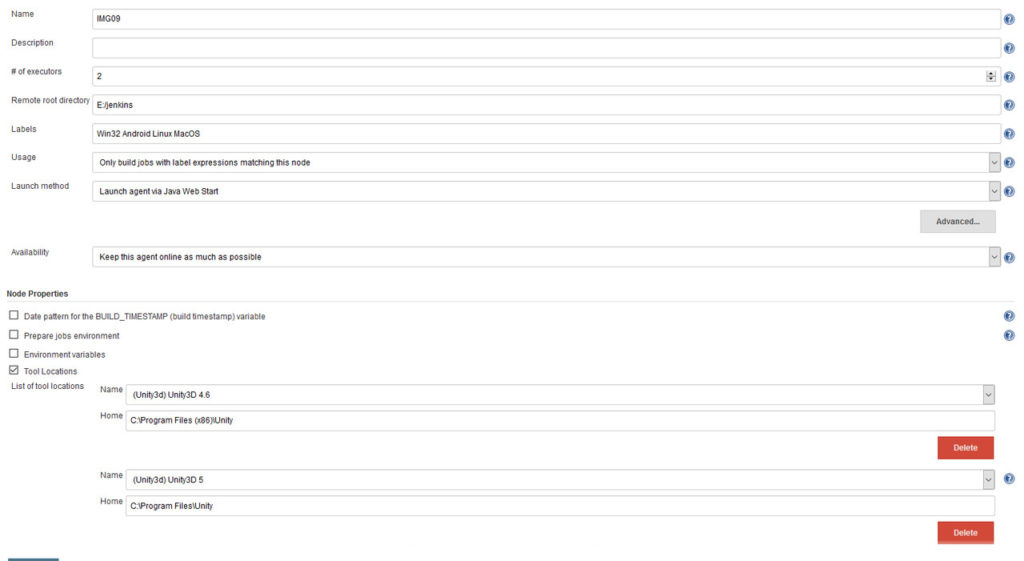
The Jenkins agent is now started automatically when the user logs into windows. If you want you can setup wake-on-lan and let the user login automatically once the computer is started. The last thing you need to do is install Unity3D on your slave agents. After that you’ll have to specify the Unity3D installations location in the Jenkins agent settings.


OSX Slave Agents

Adding an OSX slave is a bit more complicated than adding a Windows slave node. The master and the slave will have to communicate using ssh. Jenkins already has a built-in SSH client that it uses to communicate with a remote sshd and start a slave agent. The creation of a new OSX slave node is basically the same as for Windows. As Launch Method however you need to chose Launch slave agents via SSH. Provide the IP address of the target slave computer and the ssh credentials.


The slave will need the master’s public ssh key copied to ~/.ssh/authorized_keys. This removes the need of having to enter the slave’s account details to connect via ssh. On the Jenkins master we need to create a private/public pair of authorization keys. Open the terminal on the master and generate a new key:

ssh-keygen -t rsa

Do not enter a passphrase.


Copy the public key to the slave’s agents ssh folder:

cat .ssh/id_rsa.pub | ssh &amp;amp;lt;user-of-your-osx-slave&amp;amp;gt;@&amp;amp;lt;ip-of-your-osx-slave&amp;amp;gt; 'cat &amp;amp;gt;&amp;amp;gt; .ssh/authorized_keys'


From now on you can log into your slave as the slaves user from the Jenkins master without a password.


Abstract and Outlook

If everything is setup correctly you have a very powerful automation and build pipeline for all your Unity3D projects. By letting your pipelines run automatically every time a developer commits or just in regular intervals a couple of times per day, you reduce the probability of build or compile errors being undetected for a longer time. Adding a stop-and-fix mentality once a build fails will leave your repository in a state that is always build-, deploy- and presentable to your stakeholders. Continuous integration will add real business value to your company and increase your reputation as a professional game development company.


About the author:
Ulrich Kaminski is the Technical Director of it Matters Games. He graduated from the University of Magdeburg and holds a diploma of engineering in computational visualistics (CV). During his 5 years at Reakktor Media, Ulrich gained extensive knowledge in AAA development. Since 2012 Ulrich has been working at it Matters Games, successfully developing and shipping games to a global market.

Intro

In the previous part I explained how to set up Jenkins and how to run a simple free-style job to build a Unity3D project. This works fine for all Unity3D projects that don’t require any additional steps after the Unity build step has finished (e.g. Standalone and Android builds). If you are targeting iOS or tvOS, you need to add an additional step to build and package the application, making it a deployable app package.

In this part of the series I am going to describe the integration of the Xcode build step into a Jenkins free-style job. You will be able to build a Xcode project and export a so called *.ipa file. An ipa file is an iOS archive which packages the actual iOS application into a deployable package. When signed correctly the ipa file can be transferred to an iOS device using e.g. iTunes or Testflight.


Preparing Xcode

If not already done install Xcode from the OS X App Store. Once you have installed Xcode start it at least once. This will install some additional mandatory Xcode components. Additionally you will need to install the Xcode command line developer tools. The command line tools enable Jenkins to perform Xcode builds, and then package and sign apps in headless mode. You’ll find them here: Command Line Tools. To download them you’ll need an Apple Developer Account. If not already done create one. This is necessary anyway to be able to sign and deploy apps to the App Store.

Before being able to package an app you have to create a developer certificate and provisioning profiles for your app. Use the Apple Developer Member Center to create new app IDs, provisioning profiles or upload new developer certificates. Here is a guide on how to create, install and maintain developer certificates and provisioning profiles of your Apple Developer Account.


Preparing Jenkins

If not already done, install the latest version of the Jenkins Xcode plugin. In Jenkins go to Manage Jenkins -> Manage Plugins. Switch to the Available tab and search for Xcode. Install the resulting Xcode integration plugin.

Now it’s time to set up some global settings for Xcode. Go to Manage Jenkins -> Global Configuration. Scroll to the Xcode settings and check if the following settings are correct:


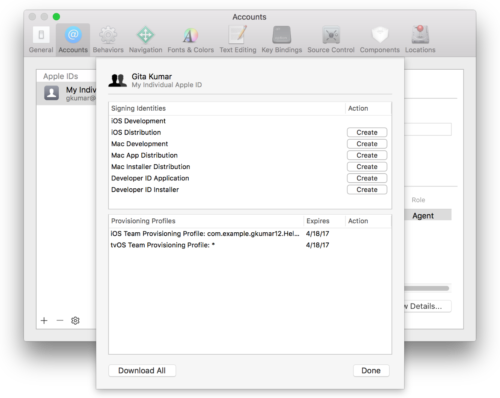
Newer versions of the Xcode integration plugin require a list of available development teams to sign ipa files with a provisioning profile. Therefore you need to add at least one Apple Development Team, specifying a Jenkins internal name and the Team ID:


The last thing you need to set up is the default keychain that should be unlocked to perform the signing:


Specify a Jenkins internal name for your keychain, the keychain path and the password. By default this will be your logged in OS X user.


Changing the Build Job

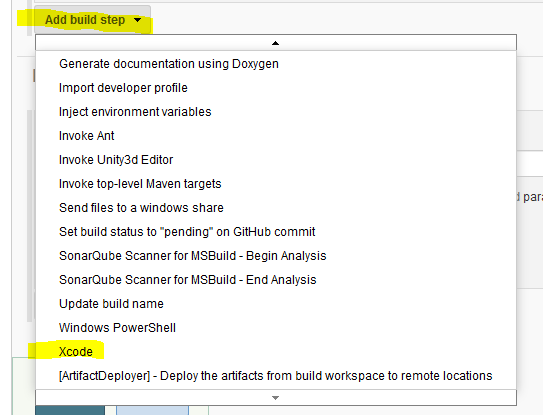
The first thing you need to do is to add a new Xcode build step into the existing Jenkins job. Add it after the Unity3D build step:


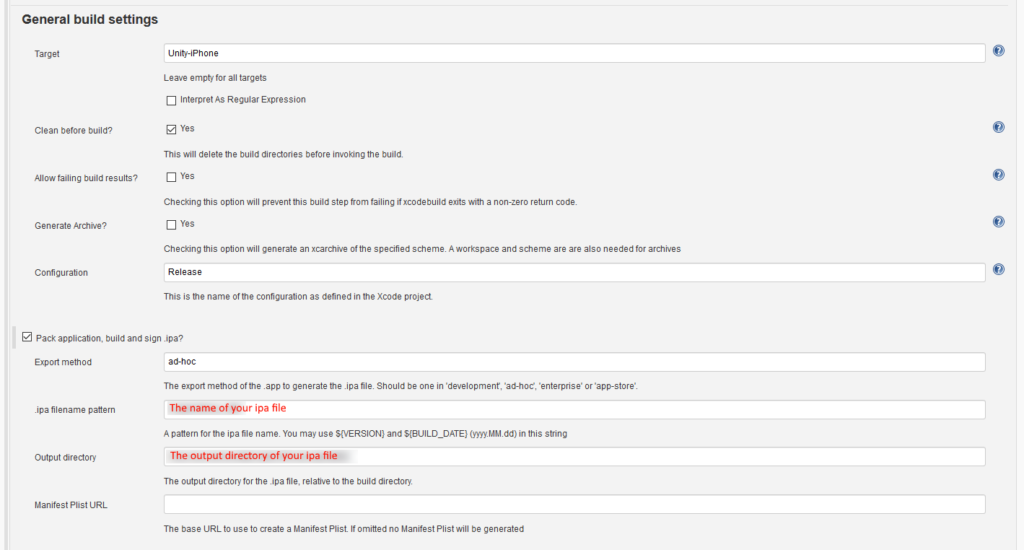
Once the build step is added, use the following general build settings:


Specify the target ipa name and the target output location for your ipa file. Define the export method with ad-hoc for Ad-Hoc signed builds and app-store for builds that are deployed into the App Store or Testflight.


In the next section select the development team you added in the Global Configuration for Xcode and the keychain to unlock:


Please make sure you’ve installed all needed provisioning profiles and developer certificates on your build machine.


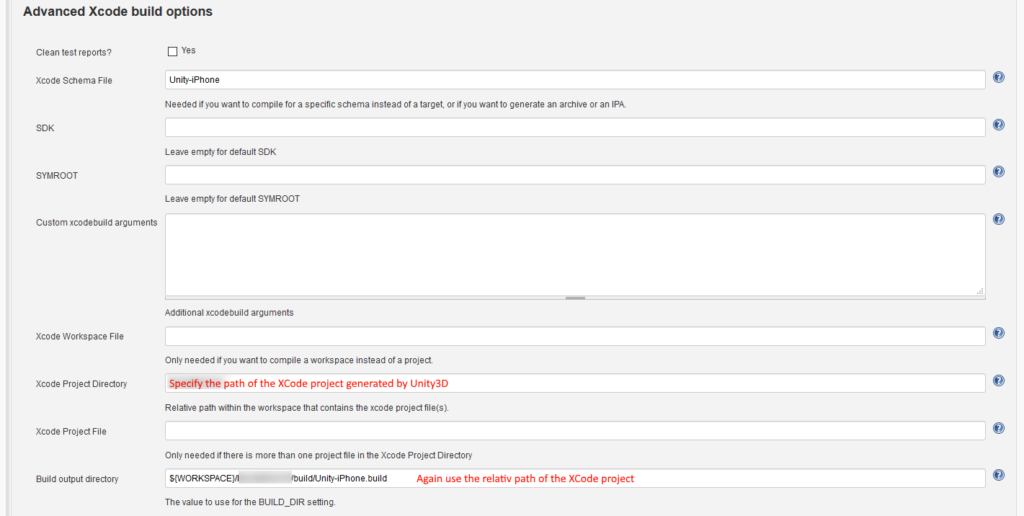
Next specify the Xcode project to build. Use the following settings:


The latest version of the Xcode integration plugin does not use xcrun to package apps. Instead is uses xcodebuild. Therefore you have to define the Xcode scheme file. The default for Unity3D projects is Unity-iPhone. The Xcode project directory is the path of the Xcode project exported by Unity3D relative to the workspace directory. The build output directory is the same as the project directory prefixed with the ${WORSPACE} environment variable and postfixed with build/Unity-iPhone.build.


From this point on you are able to create an ipa file with your Jenkins build job.


Multiple Versions of Xcode

Some of our projects at it Matters Games only support an older version of Unity3D. Unfortunately, the latest version of Xcode is not compatible with those. Therefore, we have to install multiple versions of Xcode on our build machine and add a pre-selection to the build job. This can be achieved by changing the developer directory environment variable before performing the Xcode build step. Jenkins has the possibility to inject variables into the build process. By injecting a new path to the DEVELOPER_DIR variable a different version of Xcode will be used:


We have two installations of Xcode: the latest version of Xcode 8 and Xcode 7. If both versions are installed in separate application folders, like let’s say Applications/Xcode8 and Applications/Xcode7, you can use the following content for the Properties Content field to select the target version of Xcode:

DEVELOPER_DIR=/Applications/Xcode8.app/Contents/Developer
DEVELOPER_DIR=/Applications/Xcode7.app/Contents/Developer


Abstract and Outlook

Automatically performing a XCode build step creating an ipa file for deployment is a big step forward in Unity3D iOS development. We have projects where we need to create builds for multiple versions of a game a couple of times per day. Performing builds manually can block a developer for hours. Using Jenkins saves a lot of time and adds real value to the development of any project. Furthermore, all of your employees and clients are able to deploy and test build results of your Jenkins jobs very easily.

If you are working on multiple projects in parallel your number of builds will probably also increase. Depending on the size of your projects each Unity3D build can take a couple of minutes. This will lead to the point were your build pipeline will be blocked by the pure number of builds. To avoid long waiting times one can add so called slave nodes to Jenkins. In the third part of this series I will explain how to add additional Windows and OS X slaves to the CI pipeline, increasing the number of builds that can be performed in parallel.


About the author:
Ulrich Kaminski is the Technical Director of it Matters Games. He graduated from the University of Magdeburg and holds a diploma of engineering in computational visualistics (CV). During his 5 years at Reakktor Media, Ulrich gained extensive knowledge in AAA development. Since 2012 Ulrich has been working at it Matters Games, successfully developing and shipping games to a global market.

Introduction

Jenkins is a Continuous Integration and automation server. It is an open-source and a web-based application written in Java, which can be installed on any platform that supports the Java Runtime. With the addition of hundreds of plugins Jenkins can be used to automate Continuous Integration tasks for many programming languages. Here at it Matters Games we are using Jenkins to automatically build all of our Unity3D based game projects and the Doxygen code documentation. Even for smaller companies and projects you can’t neglect the advantage of having a centralized place to keep all your build configurations, automate your builds and tests, and store all build results.

This is the first part of a series that will explain in detail:

  • How to set up a Jenkins server
  • How to perform Unity3D builds
  • How to integrate Xcode
  • How to add additional slave nodes to perform builds in parallel

In this post I will describe what hardware you need, how to set up a so called Jenkins Master Server and how to run your first build job for a Unity3D project.


The Basic Setup

  • Even if you can install Jenkins on a Windows or Linux machine, I recommend using OS X.
  • You should install a fast hard drive, e.g. an SSD.
  • Make sure your master has enough storage; we are using a minimum of 512GB to be able to store all build job workspaces and the build artifacts. 8GB of memory should be enough for building Unity3D projects.
  • You need at least OS X 10.8; we were unable to install the latest version of Jenkins on an older version of OS X. Older versions do not support the latest Java SDK. If your are targeting the latest iOS Version 10.3 you will need to install OS X 10.12 (Sierra) anyways.
  • It might be reasonable to use a so called Hackintosh (a regular PC with OS X installed). Jenkins and Unity3D work absolutely fine on a Hackintosh (Details on how to set up a Hackintosh can be found here). However, please note that installing OS X an a different computer than a Mac violates the Apple terms of condition.


Once you have your machine up and running you need the following things:

  • The Jenkins install package
  • An OS X user (best the default one)
  • The latest Java SDK being installed
  • The latest version of Git (only needed if Git is used as SCM)
  • Unity3D (versions prior to Unity3D 5 need a pro license to execute command line builds, newer versions don’t)
  • Xcode (if you target iOS platforms)


After finishing installing Jenkins you can open http://localhost:8080 in Safari. Unfortunately, as we are going to use Jenkins with Unity3D we have to change the out of the box Jenkins setup. Unity3D needs to be started with a user that has access to the OS X windowserver. To be able to do so, Jenkins has to run as a LaunchAgent with a logged-in user.


First you need to stop Jenkins. Open the Terminal and enter the following command:

sudo launchctl unload /Library/LaunchDaemons/org.jenkins-ci.plist


Move the Jenkins LaunchDaemon to LaunchAgents

sudo mv /Library/LaunchDaemons/org.jenkins-ci.plist /Library/LaunchAgents/org.jenkins-ci.plist


No we have to change the default user for the LaunchAgent:

sudo vi /Library/LaunchAgents/org.jenkins-ci.plist


Find the part that looks like this:

&lt;key&gt;UserName&lt;/key&gt;
&lt;string&gt;Jenkins&lt;/string&gt;


And change it to this:

&lt;key&gt;UserName&lt;/key&gt;
&lt;string&gt;whatever-username-your-logged-in-account-has&lt;/string&gt;


You need access to the Jenkins work (home) directory:

cd /Users/Shared/Jenkins/
sudo chown -R your_logged_in_username .


Since OS X Yosemite there is a new log rotation system. You have to give your user access to var/log/jenkins:

sudo chown -R your_logged_in_username: /var/log/jenkins


As it seems, this step has to be repeated every time you update the major version of OS X.


Edit the log rotation:

sudo nano /etc/newsyslog.d/jenkins.conf


Change the following line to accordingly:

/var/log/jenkins/jenkins .log your_logged_in_username:jenkins 644 3 * $D0 J


Now save the file and restart Jenkins with the following command:

sudo launchctl load /Library/LaunchAgents/org.jenkins-ci.plist


Now Jenkins should be running using your logged-in user which has access to the windowserver. Open http://localhost:8080 in Safari.


Installing Plugins

You’ll need to install the Unity3d plugin to be able to perform Unity3D builds with Jenkins. This plugin makes it very easy to use Unity3D installations as a build step in Jenkins jobs.

Inside Jenkins go to Manage Jenkins → Manage Plugins → Available. Search for “Unity” and install the resulting plugin. As we are already here, we should install some more useful plugins.

Once you are done installing the plugins Jenkins might have to restart. The following links can be used to restart or shutdown Jenkins manually:

http://localhost:8080/exit
http://localhost:8080/restart
http://localhost:8080/reload


Setup Unity3D for Jenkins

Your Unity3D installation should be set up correctly on each Jenkins instance. For example if you target Android platforms you should install the latest Android SDK and point the Unity3D Editor to it. If you target iOS platforms, then Xcode should be installed properly. Once everything is in place, you have to add your Unity3D installation to Jenkins.

In Jenkins go to Manage Jenkins → Configure System. The Unity3D Jenkins plugin has added a new tool entry to Jenkins. Add a new Unity3D installation which points to your Unity3D Editor location in OS X Applications.


Jenkins Unity3D installations


Create Your First Build Job

Now that you have everything set up and in place it is time to create your first build job. In the Jenkins sidebar click on New Item. Select Freestyle Project and give the job a name. A page opens with your jobs configuration. The first thing to do is to set up your source code management.

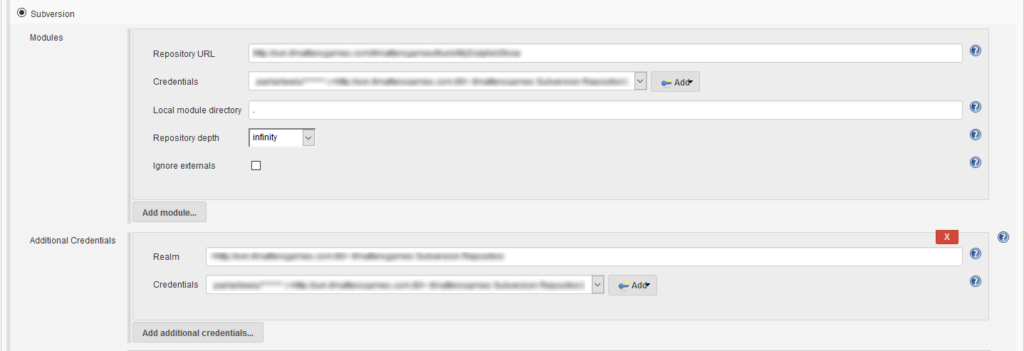
If you are using a SVN enter the repository URL and your SVN credentials. We had some trouble checking out from SVN repositories that included externals. For some reason adding the same credentials twice as additional credentials resolved the issue.


Build job SVN setup


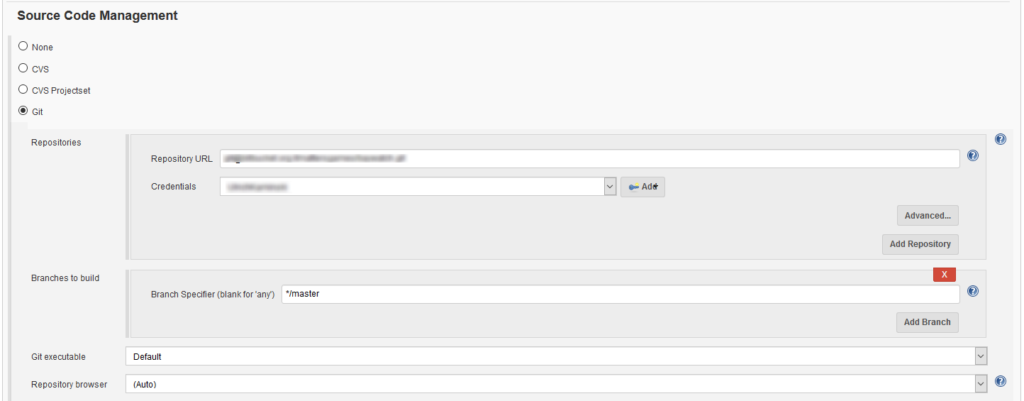
For Git it is basically the same. Enter your Git URL and set up the Git credentials for your repository:


Build job Git setup


You might run into some trouble if your Git repositories are using sub-modules. Due to an issue in the Git plugin, credentials are not forwarded when pulling sub-modules. There is a way of logging into your Git remote server using a ssh connection with a private/public key. But this will be the topic of a future post.

Once you have your source code management settings entered correctly, it is time to add the actual build step. Scroll down and click Add Build Step, then choose Invoke Unity Editor. Select your target Unity3D installation and use the following command line to execute the Unity build:


Unity3D build step


-quit -batchmode -executeMethod PerformBuild -nographics 


You need to have a script in an Editor folder of your Unity3D project and a static function in that class to use -executeMethod:


// C# example
using UnityEditor;
class MyEditorScript
{
     static void PerformBuild ()
     {
         string[] scenes = { "Assets/MyScene.unity" };
         BuildPipeline.BuildPlayer(scenes, ...);
     }
}


More details on that can be found here.

Save the job configuration. Now it’s time to run your first build job: just click the Build Now button in the jobs sidebar. Jenkins will now check out your projects source code from the configured SCM repository. After that the Unity command line is executed. If your PerformBuild method is set up correctly you will get the build artifacts inside the job’s workspace.


Abstract and Outlook

You now have a Jenkins master server up and running. The server starts automatically when the Mac starts up and the user logs in. You should automate that process using e.g. “wake on lan” or something like that. The default OS X user should also log in automatically.

In the next part of this series I’m going to describe how to build iOS projects that will create an ipa package which can be directly deployed onto a device, to Testflight or to the Apple App Store.


About the author:
Ulrich Kaminski is the Technical Director of it Matters Games. He graduated from the University of Magdeburg and holds a diploma of engineering in computational visualistics (CV). During his 5 years at Reakktor Media, Ulrich gained extensive knowledge in AAA development. Since 2012 Ulrich has been working at it Matters Games, successfully developing and shipping games to a global market.

Introduction

At it Matters Games we have at least three people working on one project at the same time. On larger projects we had even more than 10 people being involved during development peaks. Sometimes people are even working from home. How can we make sure that the project is still running and deployable even when the developers are working on totally different features at the same time and code is added? How does one make sure that no one breaks different parts of the code or introduces unexpected side effects?


Traditionally software companies are using a dedicated quality assurance (QA) team. Once every change is integrated into the project, the testers will execute different predefined sets of tests, resulting in various test and bug reports. All reports will be added to a bug tracker. If any bugs occur developers will take care of them. Once bugs are fixed the QA will test again. This QA feedback loop will hopefully lead to a “bug free” project within a couple of days or even weeks.


In most cases every project has a dedicated QA and bug-fixing phase. A couple of developers will take care of any occurring problems, blocking them for any other task or from developing new features. Although very important, this phase can be very cost intensive and a grind for developers. We had projects were this phase would go on for month, leaving behind exhausted and disappointed developers.


Extreme Programming Practices

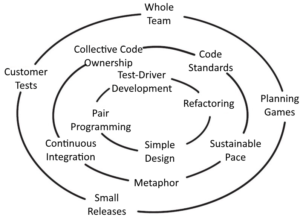
Extreme programming, also called XP, was developed by Kent Beck in 1996 (see also Extreme Programming Explained).  It describes practices like for example Pair Programming, Refactoring, Collective Ownership and Test-Driven Development:

Extreme Programming Practices


Using Continuous Integration (CI) and Test-Driven Development (TDD) reduces feedback loops to minutes, giving developers time to work on new tasks and features. Both will reduce the lengthy building and testing phases, also reducing the amount of people being involved in those processes. This adds measurable value to the business and improves the quality of projects.
All practices were meant to add value to a company and improve the quality of the software. They should reduce the feedback loops and make sure we are building the thing right. In the following sections I will introduce two practices we at it Matters Games are using to increase the success of our projects.


Continuous Integration

CI is also one practice from XPContinuous Integration makes sure that builds are reproducible and reliable. In this practice developers commit their code and assets to a remote version control repository (like Git). This is best done a couple of times per day. Every time a new commit is done, the continuous integration server (like Jenkins) will pull a fresh copy of the project sources from the remote repository, build the project and execute all tests. If the build or any of the tests fail, a email or chat message is send to every developer. It’s preferable to combine this with a “stop and fix” attitude. Team members have to stop whatever they are doing and fix the problem introduced with the latest change. This makes sure that the project is always in a deployable condition. Problems should not accumulate until the QA phase is starting.


Automated Testing and Test-Driven Development

Sometimes developer think TDD is only about unit testing. But TDD does not define the granularity to which the tests should be written. There are many different type of tests. They can overlap and even conflict with each other. TDD is an evolution of concepts from Test First. Test First helps developers to think out ideas, concentrate on one problem at a time, and be precise about defining responsibilities and functionalities of modules, classes and even functions before writing them. TDD will give developer the confidence that their code is working as expected. Tests running in milliseconds, like unit tests, or in seconds, like integration tests, create very quick feedback loops during the development process. Thinking about what to test first on a module or class will help developers write code that is clean, simple and satisfies the requirements defined beforehand. It also helps avoiding overengineering and reduces the complexity of code. Simple and easy to read code is always easier to maintain and will reduce the probability of bugs.  A lot more on this topic can be found in Kent Beck’s book: Test Driven Development: By Example.


As a product grows, more and more features are added. Therefore, more and more features have to be tested by the QA, increasing the time it takes the QA team to test every feature manually. Automated testing of the correctness of your code can reduce the QA feedback loop from weeks to minutes. With a click of a button an entire system is tested and gives the assurance that the product is still deployable for production even after the last change was made. This avoids long QA phases for the business. Using automated testing also reduces the risk of writing more code based on erroneous code, reducing the bug-fixing costs even further.


But no matter what tests you perform, they should be automated if possible. Testing should always be a matter of just one simple button click in every developers environment. This will increase the frequency and also the likelihood of performing the tests. It’s best to integrate them into your CI pipeline.


Best Practices in Game Development


Combine TDD with CI

Combining TDD with CI can make a whole QA team redundant. This can drastically reduce the costs and the time it takes to bring a game to market. At it Matters Games we are using Unity3D as our main game engine. Running Unity3D in headless mode enables us to build and deploy app packages using a simple command line. At our office we have one Jenkins master server and several so called “slave nodes”. Jenkins calls the unity command line to build and deploy our projects every time a developer has committed a change to a project’s repository. To increase parallelism and speed of builds, build jobs are spread across slave nodes trough the network. Furthermore, since Unity3D 5.3 the nunit framework and integration tests are part of the Unity3D editor. With a simple command line tests are executed and written into a nunit compatible xml file. So we are able to perform tests using our CI server. The status of the builds and the tests is notified by mail and into a slack channel. Developers are always aware of successful and more importantly failing builds.


Avoid Manual Steps

Building and testing the final package of a game should never include any additional manual steps except e.g. starting the master build. Manual steps are prone to introduce errors. For example, never force the developer to change the output XCode project manually before building and exporting the final ipa file (like adding additional frameworks, changing provisioning profiles or setting compiler flags). Also build artifacts should never be deployed manually to an artifact repository. Best let the CI server deploy build artifacts to a repository automatically. This reduces the chance of sending a wrong version of a project to the customer. If you bulk build for multiple platforms like Google, Amazon and iOS like we do, make sure you are building the same revision of the repository. Think about “checkout once” for all versions of the game. Clean the workspace before building. This will remove the possibility of intermediate build files interfering with the current build. Archive additional build artifacts like test results and log files. This will help developers track errors and failures.


Know Your Tools

Additionally it should be very easy for developers to build and deploy the game in their local environment. If it takes developers more than just a click of a button to setup, build or test different versions of the game, they will not do it. They will not debug and test their changes before committing them to the repository. Building locally should be as easy as building using CI. Developers should be familiar with the build pipeline and the build scripts. Make sure everybody knows the build tools and how to use them.


Write Tests

There should always be time for writing and automating tests, but never add a task to the sprint called e.g. “Write Unit Tests”. Writing tests should be part of each and every coding task. If you create a separate task for testing, it will be the first task that is obsoleted by the project manager when it comes to timing issues. Be pragmatic with testing. It is not easy to decouple Unity3D code by using e.g. dependency injection and therefore allow for unit testing. There is no interface for the MonoBehaviour which allows for mocking. It can take a lot of effort to create tests for them. Always try to utilize methods that add more value to the project and create a quicker feedback loop with respect to the scope and the budget of the project. If it means doing TDD, than do it. If it means doing something completely different, use that method instead. Be agile and adopt to new practices if they work better for you.


Be Lazy

Be as lazy as possible. This does not mean you should lay back and let others do the work. This simply means adding automation wherever possible. Manual steps introduce errors, so avoid them. Think about scripts that can automate project setup, builds, platform switches, asset integration, testing and so on. This will give developers more time to concentrate on more important tasks: creating a quality and fun game.


More to Come

In the next couple of weeks I will describe how we at it Matters Games set up our CI pipeline in detail. I will describe:

  • how to create a master server and add build slaves to it
  • how to use Unity3D together with Jenkins
  • how to deploy builds
  • how to run tests on Jenkins and how to use Jenkins Pipelines with Unity3D projects.


About the author:
Ulrich Kaminski is the Technical Director of it Matters Games. He graduated from the University of Magdeburg and holds a diploma of engineering in computational visualistics (CV). During his 5 years at Reakktor Media, Ulrich gained extensive knowledge in AAA development. Since 2012 Ulrich has been working at it Matters Games, successfully developing and shipping games to a global market.